Finger Stretcher Hand Resistance Band
I’ve been using my Finger Stretcher Hand Resistance Band to counteract all the time I spend using a computer mouse, and it’s been a game-changer for building strength in my fingers, hands, and forearms. I had this nagging hand pain, so I decided to give it a shot, and I’m really glad I did.
At first, the finger stretch trainer was a bit tricky to put on, but I got the hang of it pretty quickly. You start by picking the band with the right resistance level. Then, you slide each finger into its designated loop, making sure it’s comfortably positioned at the base of your fingers. You wrap the Velcro around one wrist and do the same with the other hand. After a few tries, it becomes second nature. Just open and close your fingers, stretch the band, and feel the resistance.
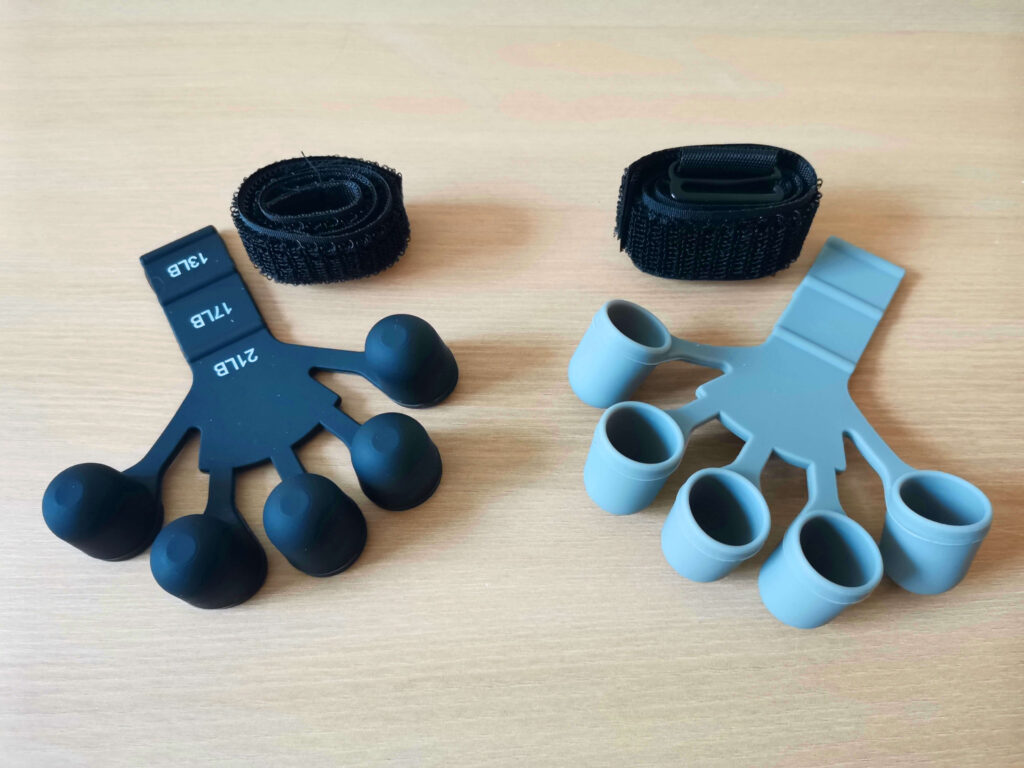
Putting on the Finger Stretcher Hand Resistance Band is straightforward. Here’s a step-by-step guide:
- Choose the Right Resistance Level: Select a band with the appropriate resistance level for your strength and training needs.
- Position Your Hand: Place your hand flat with your fingers spread apart.
- Place the Band: Slide each finger into one of the loops or holes of the resistance band. Ensure the band is placed near the base of your fingers, not too close to the tips.
- Adjust the Band: Make sure the band is evenly stretched across your fingers and is not twisted. The band should feel snug but not too tight.
- Start Stretching: Slowly close your fingers together, then open them wide against the resistance of the band. Repeat this motion for the desired number of repetitions.
- Exercise Variations: You can also try different exercises, such as bending your fingers or rotating your hand, to target different muscle groups.
I’ve tried two different sets: one with thicker rubber for a more intense workout (21 LB to 13 LB tension) and one that’s easier on the fingers (11 LB to 6.6 LB tension). You can easily adjust the resistance by moving the clip through different holes. This tool isn’t just for us computer users. It’s perfect for athletes, musicians, or anyone looking to boost their grip strength. Here are some other awesome benefits:
- Rehabilitation and Therapy: Great for physical therapy and recovering from hand or finger injuries, surgery, or conditions like arthritis and tendinitis.
- Improving Flexibility and Dexterity: Regular use enhances flexibility and dexterity, making everyday tasks easier.
- Preventing Injury: Strengthening your hand and finger muscles helps prevent repetitive strain injuries like carpal tunnel syndrome.
- Enhancing Performance: Perfect for athletes and musicians to improve hand strength and endurance.
- Stress Relief: Stretching and exercising your hands is a fantastic way to relieve stress and relax.
After just a few days of using these bands, my hand pain disappeared, and my tensed-up mouse muscles loosened up. The bands provide a controlled and smooth range of motion, reducing the risk of injury. They’re perfect for muscle pain, joint issues, or recovery from injuries. The constant tension throughout the motion leads to better muscle activation and more effective workouts.
Full test video available here:
Plus, these resistance bands are great for stability and balance exercises, engaging your core muscles. They offer a low-impact workout that’s gentle on the joints and perfect for a less strenuous option. You can easily combine them with other exercise equipment or use them alone for a super customizable workout routine.
I did find a couple of small flaws. My version should have hollowed-out finger tips because my fingertips sweat a lot, even when I’m not moving my fingers. While mine haven’t shown any wear issues yet, resistance bands can wear out or break over time, especially with frequent use. They might not offer precise increments of resistance like weights, making it harder to measure progress accurately. Lastly, continuous contact with the bands can cause skin irritation, especially if you have sensitive skin.
Overall, I really like these bands and would recommend them to everyone. They’ve made a big difference for me, and I think they’ll be great for you too!
Testing the Bow MD190L, Wireless Vertical Mouse. Is it any good?
I had that terrible pain in my right hand after using a conventional horizontal mouse. Even though my previous mouse was the top-notch Logitech MX Master 3S, I gradually started to feel fatigue and discomfort in my wrist and the associated muscles. So, I decided to try a vertical mouse and share my experience with you.
Using a computer mouse for extended periods can lead to discomfort and strain in several muscles and areas of the body. Here are the key muscles and regions that can suffer:
- Forearm Muscles: The muscles in the forearm, particularly the extensor and flexor muscles, can become overworked due to repetitive movements and maintaining a static position.
- Wrist Muscles and Tendons: The muscles and tendons around the wrist, such as the extensor carpi radialis and the flexor carpi radialis, can experience strain. This can lead to conditions like tendinitis or carpal tunnel syndrome.
- Shoulder Muscles: The trapezius and deltoid muscles in the shoulder can become tense from holding the arm in an elevated position for long periods.
- Neck Muscles: The muscles in the neck, especially the upper trapezius, can become strained due to poor posture and the tendency to lean forward while using a computer mouse.
- Hand Muscles: The small muscles in the hand, including the lumbricals and interossei, can become fatigued from continuous clicking and scrolling.
- Upper Back Muscles: The muscles in the upper back, such as the rhomboids and the lower trapezius, can suffer from prolonged use due to poor ergonomic setup and posture.
- Finger Muscles and Tendons: The repetitive clicking and scrolling motions can lead to strain in the tendons of the fingers, particularly the extensor tendons.
Prolonged and improper use of a computer mouse can contribute to repetitive strain injuries (RSIs), which include conditions like carpal tunnel syndrome, tendinitis, and tenosynovitis. Proper ergonomics, regular breaks, and exercises to strengthen and stretch these muscles can help mitigate these issues.
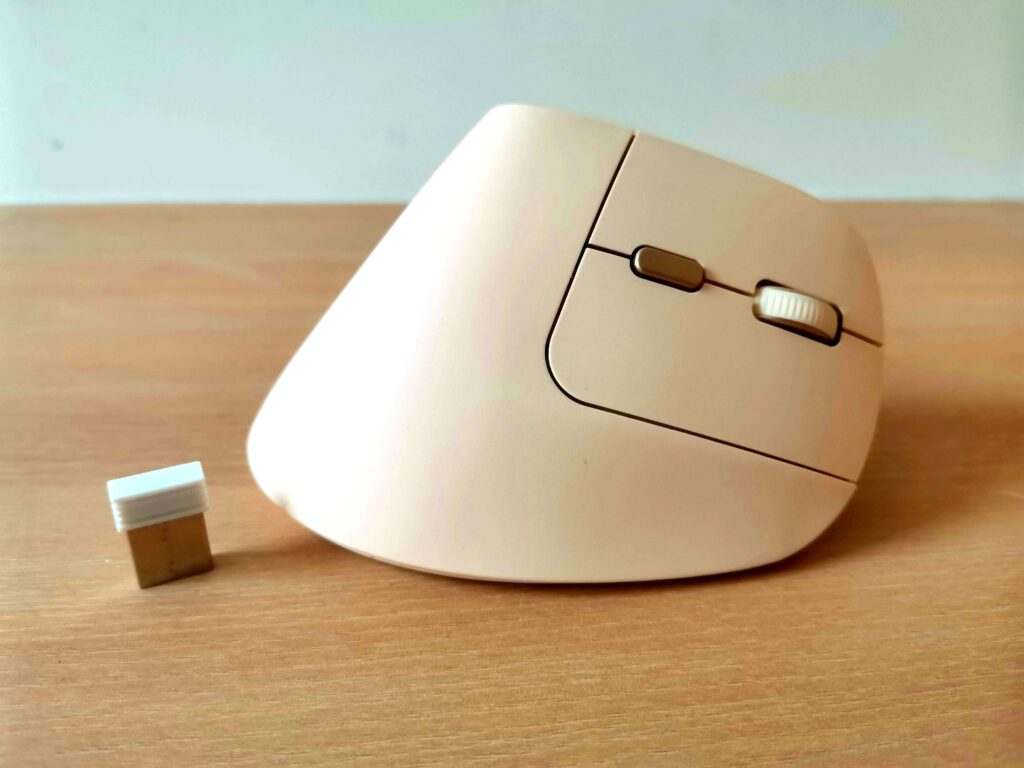
I bought the Bow MD190L Wireless Vertical Mouse, which costs less than half the price of my previous mouse. Let me tell you what I got for my money.
If you’re considering a more ergonomically sound mouse for your tired hand, you might be struggling with the same pains I had. Did this new mouse help me? Absolutely, but let’s break it down.
First off, the build quality is decent. Although the plastic casing feels a bit cheap and lightweight, it glides effortlessly on a mouse pad, making it easy to use. The matte surface provides a good grip, and combined with a decent sensor, it performs its job well.
The shape of the mouse is quite ergonomic. Your hand rests at a comfortable angle, around 20 degrees, which isn’t completely vertical but offers a good lean. The design is particularly suitable for small hands, with buttons that are nearly silent and require minimal effort to press. They are just audible enough for you manager to know you’re working but not too loud to be disruptive. However, the buttons lack a bit of crispness, feeling somewhat blunt when pressed.
The mouse is made from basic materials, without any fancy rubber padding or high-quality ABS plastic. There’s a noticeable parting line where the two halves of the mouse meet, which tends to collect dust and dirt, especially on my pink model. Compared to my previous mouse, it lacks the anti-slip buttons that would give the mouse a premium feeling and would be fun to play with.
The side button is positioned a bit too close to my thumb, leading to accidental presses that can cause unintended actions on my computer. For instance, when browsing the internet, pressing this button can take me back a page. This was annoying at first, but muscle memory has taught me to keep my thumb flat to avoid this issue. Despite this, my thumb sits comfortably in the inner recess, although it could benefit from a bit more chiseling towards the bottom.
Overall, the grip is surprisingly natural for a $40 mouse. After a while, you might even forget you’re holding it, instinctively searching for your mouse while it’s already in your hand. The good lean angle and decent surface curvature make your hand rest comfortably, providing full control over the wireless Bow MD190L.
The mouse comes with the usual features. It charges quickly, connects wirelessly immediately after plugging in, and lasts long. Despite its flaws, I quite like this mouse and would recommend it to anyone looking for an affordable, ergonomic option to alleviate wrist and hand pain.
Portable Plastic Bag Sealer
If you’re not sure how to use this plastic bag sealer, here’s a quick and thorough explanation. The sealer has a designated slot where you insert your opened plastic bags, and it works well even if the edges of your plastic bags are rough or uneven. By running these edges through the slot, the sealer applies heat to melt and seal the bag, making it closed and secure.
The heated wire strip can handle plastic bag edges up to 3.5 cm in depth. Once you fully depress the larger outer button, it activates the circuit, and the heat generated by the hot wire will melt and seal the plastic or whatever material you are dealing with.
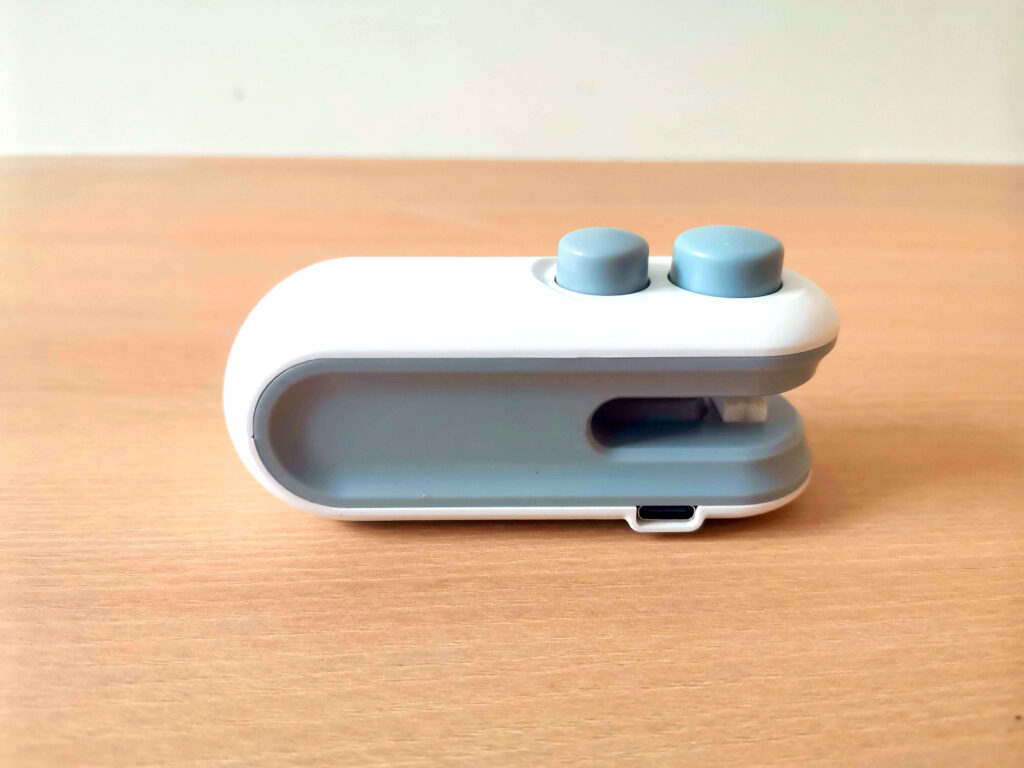
This mini sealer caught my eye because it has a built-in rechargeable battery and is very compact. It also appears to be sturdy, with no rattling parts that could break or disengage. If you need to seal household plastic bags, this device is perfect for you.
The sealer can handle both thin and thick plastic bags, as well as PP, PE, PPC, and aluminum-like bags. There is no need to preheat this sealer; the entire process is automatic and straightforward. There are no complicated adjustments for timing, power, or temperature — just heat up and seal.
This heat seal bag closer is a versatile kitchen accessory with two functions: opening bags and sealing them. The built-in knife, hidden under the smaller button, can be used to simply cut open plastic bags. It can also be used to cut away excess plastic while sealing, allowing you to perform two actions at the same time.
Bath mat with foot scrubber
When you take it out of the box, you have to clip the outer ear pads into the mat base. There are 6 pins on each side of the left and right ear, making it 24 pins to push in. The mat has a funny rabbit head shape with a smiley face. My children love it.
I’ve been using this slip-resistant and exfoliating bath mat for a while now, and I have to say, it’s been wonderful. The brush helps scrub and clean your feet without the need to bend over or stretch, making it incredibly convenient. With the summer heat, our feet sweat a lot, and this non-slip mat has been a real lifesaver for me, my wife, and our children.
The mat grips securely to the bottom of the bath or shower base. To prevent slipping, make sure there’s no soap or foam on the surface when you place the mat down.
The scrubber is great because it tackles bad smells, and you don’t have to worry about losing your balance while getting rid of them.
My family uses it regularly. It doesn’t hold dirt or retain odors. Just remember to rinse the mat with hot water every couple of days, or ideally after each use. You can also hang it up to dry for the next person.
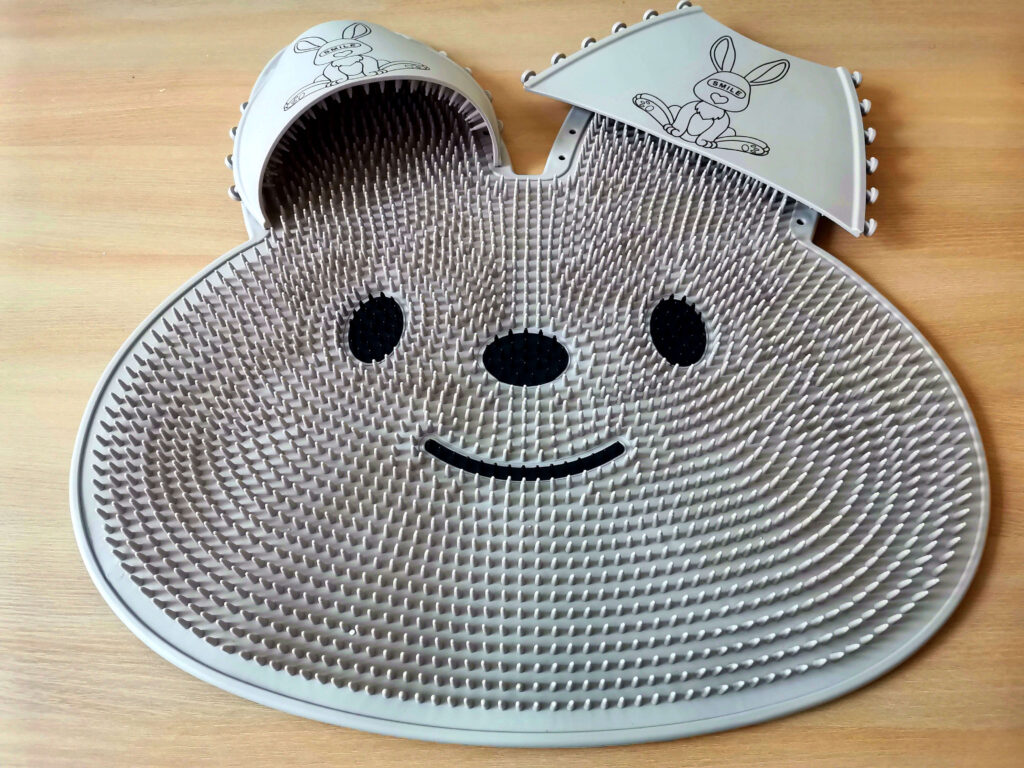
While the rubber material isn’t completely antibacterial, it doesn’t get moldy if you maintain it properly. Keep it clean after every use, hang it to dry occasionally, and you’ll be fine. Just avoid using bleach as it will damage the rubber over time, eventually leading to the mat’s deterioration.
I highly recommend this mat to everyone looking for an easy and effective way to clean their feet in the shower. It’s been a fantastic addition to our bathroom routine!
How do I know if my bath mat with foot scrubber is antibacterial?
A bath mat with a foot scrubber can be antibacterial, but it depends on the specific product and the materials used. Some bath mats and foot scrubbers are made with materials that have antibacterial properties or are treated with antibacterial agents to help prevent the growth of bacteria and mold.
When purchasing a bath mat with a foot scrubber, look for these features to ensure it is antibacterial:
- Antibacterial Materials: Some products are made with materials that naturally resist bacteria, such as certain types of rubber or silicone.
- Antibacterial Treatment: Some mats are treated with antibacterial agents to inhibit the growth of bacteria and mold.
- Product Claims: Check the product description and packaging for any claims about antibacterial properties.
If maintaining an antibacterial environment is important, also consider regularly cleaning and drying the mat to prevent bacterial growth.
A bath mat with a foot scrubber can be very effective at massaging your feet. It has hundreds of scrubbing and tickling bristles. My mat is designed with a brushy texture and spikes that help stimulate and massage my feet, sometimes even without realizing it.
Here are some benefits and features to look for:
Textured Surface: Many bath mats with foot scrubbers have raised textures, such as bristles, nubs, or ridges, which can provide a massaging effect as you rub your feet against them.
Soft and Flexible Material: Mats made from soft, flexible materials like silicone or rubber can conform to the shape of your feet and provide a gentle, comfortable massage.
Stimulates Circulation: Regular use of a foot scrubber can help stimulate blood circulation in your feet, which can be relaxing and beneficial for overall foot health.
Ease of Use: These mats can be used with soap and water during your shower or bath, making it convenient to clean and massage your feet simultaneously.
Relaxation and Relief: For those who spend a lot of time on their feet, a foot scrubber can provide much-needed relaxation and relief from tension and soreness.
If you are looking for a bath mat that excels at massaging your feet, consider one with these features. User reviews and product descriptions like mine, for example can also provide insight into how well the mat performs as a foot massager. The mat I am using is great, it quite tickles me but also makes my feet blood circulation go faster and ,for the morning quick showers, gives my energy for the day.
My Home Waffle Maker – Frunuts Waffle Cooker
Here is another product that we bought some time ago and had the opportunity to test in our family environment. First of all, the size of this waffle machine produces waffles over 19 cm in diameter, satisfying your craving for large pancakes. The waffles that come out of the cooker are of a decent diameter and will satisfy even very hungry customers.
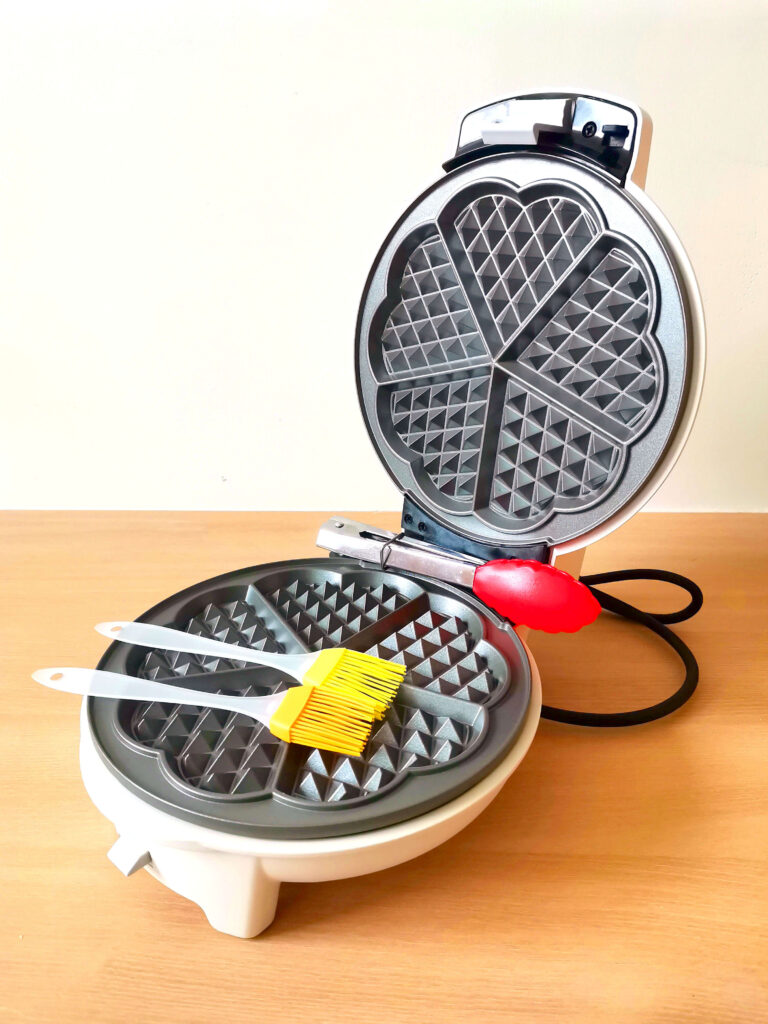
The preheating process is quite fast. Thanks to 750 watts heaters, the initial temperature gain takes about 4 minutes. I know it sounds like an eternity, especially when you have two hungry kids at home waiting for seconds. However, it’s only the first preheating that takes this long. After reaching full temperature, our waffle maker stays hot even if it has been left open for quite some time. So the first batch of pizza waffles will take you 4 minutes of preheating plus 3 minutes of cooking the waffle batter. Every batch after that will take approximately 3 minutes.
This pancake appliance has two very clear and easy-to-use knobs on the top shell. One is a timer with an indicator light for when the time is up, and the other is for setting the desired temperature. Both are super easy to use.
This is not a kitchen appliance for small children. The Frunuts waffle cooker gets really hot, including its handle, casing, and even the temperature knob. You need to be careful not to burn yourself. Fortunately, after cooking the cooker loses temperature very quickly, even if it is not opened. Additionally, it only weighs a little over 1 kg.
The top clamp of the waffle machine is slightly loose and wobbles when secured. Although not by much, it is enough to affect the beautiful pattern on your waffle. So, after you close the top clamp, don’t touch it and let the batter settle into the grooves of the waffle iron.
Here are some types of oils that are commonly used for waffle makers:
- Vegetable Oil: A common choice due to its neutral flavor and high smoke point.
- Canola Oil: Similar to vegetable oil, it has a mild flavor and high smoke point, making it a good option.
- Coconut Oil: Adds a subtle coconut flavor to the waffles. It also has a relatively high smoke point.
- Olive Oil: Can be used, but it’s best to use light olive oil due to its higher smoke point compared to extra virgin olive oil.
- Butter: Adds a rich flavor but has a lower smoke point, so it needs to be used carefully to avoid burning.
- Grape seed Oil: Has a high smoke point and a neutral flavor, making it a good option for cooking waffles.
- Avocado Oil: With a high smoke point and neutral flavor, it is also a healthy option.
When using oils or fats in a waffle maker, it’s important to brush or spray a thin layer on the plates to prevent sticking and ensure even cooking.
The non-stick top and bottom plates are easily removable, each with a designated button release mechanism. They are easy to put back in after washing and drying.
The Frunuts waffle machine is stable on your table, with 3 resting points, two of which are made of anti-slip rubber. When fully opened, it doesn’t tip over backward.
How does our compact waffle machine differ from others and should I buy one?
It is definitely sturdy. The outer shell is made of thick iron. Any plastic used is heat-resistant and doesn’t melt. The large back hinge is double-screwed on each side, meaning there are 8 properly sized screws holding the top and bottom clamp halves together.

